Thursday, 29 November 2012

Finishing up the set


I haven't really put a close up photo of Edgar on here. So here we go! I tried to use a 'flicking' method to get freckles, but it didn't work as you can maybe tell from the "birth mark" on end of his nose which was absolutely on purpose....... In the end i painted each one of them on individually. 


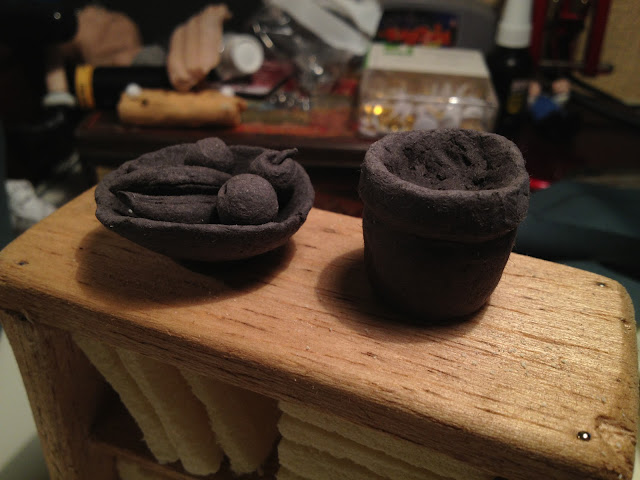
The books had book ends added on to them (just printed off the internet) (im really sorry copyright police) and I painted the plant pot and found the top of a model pine tree in the studio. I also painted the fruit.


And here it is! the finished set. I still need to fix everything down. The mug and lamp to the right hand side i am probably least happy with. Nothing special really so didn't justify a close up shot. I'll hopefully start animating on monday once i've broken down my sound and made all of my replacement mouthes.


Set & Props part 1

After visiting the frankenweenie exhibition in London back in october. I was crazy inspired to make some incredible looking props. Unfortunately, my deadline thought otherwise and I was forced to massively rush both my set and props (entirely down to my own doing, spending too long on certain things and not realising just how long a set would take to put together).

 It set out (giving myself 3 days) to make the following
  • an armchair
  • a patient sofa
  • a coffee table
  • a bookcase
  • books
  • a lamp
  • a plant pot
  • a fruit bowl (with fruit)
  • a cup of tea
  • a certificate
  • a photo frame 
  • glasses (facial ones)

the glasses were one of simpler props to make. Made from a piece of aluminium wire bent with a pair of pliers and painted a dark grey colour, I wanted to avoid using black as it could be too dark.


I bulked the sofa out with a combination of hard and soft foam. Which would then be covered in cling film and masking tape to make a net, in the same way I made the clothes for my character.


This process didnt work though, as the pattern was difficult to tell where to make the seam lines. Even when i decided on positioning for them, the sewn together pieces still didn't fit tightly enough to the sofa. In the end, i used a "Hold that together with as many pins as i can find" method, which, although very messy from a particular angle, was a lot better and quicker. 


I used the same method in creating the sofa for my patient.


For the other props I used fimo air drying clay. It was ok to work with, not as easy to sculpt as sculpey but still got the job done. It seemed to work a lot better if there was no coring inside of it as two pieces of it don't really stick to each other very well. 


The bookcase and coffee table were made with balsa wood and coloured using wood dye.
Now all I have to do is find walls and carpet, and paint/cover the rest of my props.

Sunday, 25 November 2012

Hand sewing part 2


In my last post, I think i'd got him to a stage similar to this above ^ 

For any shots when he will be looking up (i have a couple i think) I will need to cover up the armature for his neck. in order to do this, I've made a little shirt collar to go inside the jumper. This does all seem a little redundant though, as you can barely see it when his head is on, and even when you can it gets squashed by the size of the head. Looks nice though!


Once i'd fixed his leg using thread lock (one of the ball joints had come slightly loose and just needed fixing in place) The trousers were pretty straight forward to make, although I wish i'd taken photos just for the hell of it. I was on a bit of a mission to get the clothes finished so forgot to take photos. 
Also, a design flaw on my part, I'd made the shoes onto the armature, joined the foot to the leg and then padded around it. I didn't think ahead to when i would have to put the trousers on. So for this character have had to sew the trousers onto the legs. It doesn't look as good as i'd hoped but short of cutting up the foam on the leg there wasn't much I could do.

Overall, i'm happy with the way he's come out. He looks considerably more like my original drawing than any other puppet i've ever made. Now on to props and a set. (The hands in this photo look a little rigid, that is just because i'm avoiding bending the only part of my armature which is wire so it has a longer filming life)


Saturday, 24 November 2012

Hand sewing part 1


Now that the seam lines have been drawn and cut, this is what i'm left with to start making my clothes. I need to make the following:

- Jacket
- Trousers
- Sweater vest
- Shirt collar

As the vest will only be visible through the open top of the jacket, I was originally planning on just making the 'V' shape you would see. But on second thought, I need the jumper to fit all the way to where the trousers will join, otherwise you might be able to see part of the blue foam on the underside of his belly.


Above is the two stages of the jumper. I still need to make the shirt collar to go inside and block off what would be his neck. As you can see, On the left hand attempt, there is a seam right down the middle, whereas on the right hand one, the seam is only on the bottom half, meaning you can't see it through the gap in the jacket.


When sewing anything, you need to remember to leave a seam allowance. A few of these wouldn't really require this much of a seam allowance. But as im still not very good at hand sewing (and even worse at machine) I've given myself a lot to work with. 


Ignore the fact that he's only got one leg, the other is in the 'armature hospital'. The sleeves had to be trimmed down. Which i'd rather have than having them too short and remaking entire sleeves. 
Next is the trousers and shirt.

 BYE

Clothing pattern


In order to make clothes fit to the character, you need a decent pattern to work from. This can be done by just adjusting over and over a piece of material by placing it on the model until it fits. I prefer a different method. By covering any object in cling film, and then masking tape. You get a perfect cocoon of the character. You can then draw on where your seam lines will go, remembering to label which piece is which and then cut it off. leaving you with pattern pieces which fit your character perfectly. I will now start sewing clothes.  


Friday, 23 November 2012

Victory!


Previous hand post can be found here. In short, I cast my hands in latex but put nowhere near enough latex in. This time, i kind of went a little over the top. The result is a massive amount of excess which will need trimming with nail scissors


After a fair amount of time with scissors (i still need to take a lot more time over these to make them ready for filming) I have two things which resemble hands! Now to start on the clothes


Face Paints


Due to the fact that the head cracked during baking (the sculpey clay was far too thin, link here) I've had to spray the head a skin colour to make it even. When i first sprayed it, it seemed far too light. But i figured its better to start light and add darker tones than it is the other way around.


The most time consuming aspect of painting the head is without a doubt the hair. Purely down to the fact that there are so many fiddley parts where you can't get paint onto the head, but have to paint all of the hair. Makes me wish i'd done more Warhammer when i was younger!


I was particularly happy with how his side burns have come out. He is a middle aged character (as stated in the piece of dialogue) so making him completely grey was out of the question. 


I then proceeded to paint tone onto his face. This took around 1/3 of the amount of time it took to do the hair as its just basic blocking out of colour. I used a dryish brush and went for the 'dabbing' technique. I may yet go back to the head with chalk pastels in order to blend in some of the areas of tone.


This is how my character looks so far, (ignore the hands, my 2nd attempt ones are still drying). All that is left is eyebrows, glasses, replacement mouthes, a moustache, clothes, set, props and breaking down the sound........ which is... a lot! considering the time frame we've got. So im going to stop rambling on my blog now and go do some work!


(on a final note, when Tim Allen visited the uni, (the stop motion animator, not Buzz Lightyear) He advised me to hollow out the inside of the belly, still giving it shape but allowing it to be pressed in without pushing back too much. 


Thursday, 22 November 2012

Latex Casting Hands


Once the armatures had been removed from the sculpey clay (see last post here) It was time to cast them in latex. Once again, like the feet, the colour has to be mixed lighter than the final product. Hands are a lot more complicated than feet as they are a two part mould. 


The latex needs to be applied in layers to both halves of the mould. Then once enough layers (in this cast 3) have been applied, a lot more latex is added, along with a rim around both edges (this creates a split line) and the two pieces are pressed together and left over night to dry.


Once dry, the two pieces are pried apart to reveal... HANDS! or atleast something that resemble hands. They are now carefully removed from the cast.


You might not be able to tell from the photo, but these hands didn't work. The colour is slightly off, and they are far too empty. I didn't take into account how fat i'd made my hands when casting.


Nevertheless, Taking a pair of nail scissors, i trimmed the edges of the hands just as practice. 


I then had to remove the armature from the latex hands, leaving me with tiny little gloves.


On the next attempt, I have potentially gone too far the other way. I padded out the armatures with heat shrink tubing and this mystery tape we have in the studio which sticks to itself. The seam line will probably be far too thick on these, or there will be too much latex and it will not properly seal. But I wont know now until tomorrow Planning on leaving it extra time to ensure it is properly set.

FINGERS CROSSED!


Latex Casting Feet


This is the current stage of my ball and socket armature after it has been padded out (i still need to do the arms and generally trim down areas)


The next stage is to cast my feet in brown latex. Stages of the feet until now can be found here. Latex is an air drying material, which has to be applied in layers in order to dry evenly. Unlike silicone, which is a chemical reaction which, once a catalyst is added drys within a number of hours. With latex, acrylic paints can be added unless you have a latex pigment. Whereas with silicone oil paints are required in order for it to work still. No more than around 5% paint should be added, or it can alter the final outcome.


I made the 4th layer of latex slightly thicker, and left it to dry overnight. I used a brand called 'Woodland scenics rubber latex'. To some latexes you have to add a thickener but this brand was thick enough already not to need that. You'll also notice from the photo above compared to the one below, latex dries a lot darker than the original colour. This is another place where silicone is more desirable. It will dry which ever colour you make it. 


You will also notice that i left a rim around the top (technically base) of the shoe. This was so a sole could be added at a later stage. Once the shoes were removed from the cast (being careful not to let them stick to each other). They were padded with foam and the armature was placed inside. 


Next to make the soles. I could've just painted latex on but there would be no guarantee it would stay flat. Instead, I painted a thick ish sheet of latex onto a flat surface (the back of my plaster cast) and left to dry. This was then trimmed to fit the rims that i left on the latex shoes. (I also can't help but think how the look like those fancy chocolate Pringle things that used to be around)


The two pieces were stuck together using more latex and the edges were trimmed. These will now be cleaned up using lighter fluid and the blue foam legs will be properly attached and trimmed down. 
Below is a photo of the waist down of my character. Including a rigging point in the back, and a section in the front for the belly to be attached.