Wednesday, 27 March 2013

Set Designers


Its been a while since i posted anything on here, mainly due to everything slowly going wrong on my puppet build and not having anything substantial to show. There will be posts over easter!

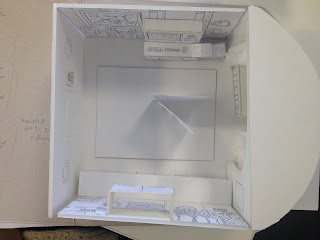
In the mean time, the one thing thats going well in my project is the set (other than the Advert, which i'll post about as well)! This year, we've been given the opportunity to collaborate with TV and Set Design students at uni to build our sets for us! If i was building the set myself I probably wouldn't have finished this project and would've just bodged something together with the resources available but because of this collaboration, the three of us (George Sean and myself (click their names for their blogs)) are getting high quality well built sets built to our specifications. 


The girls that are working with me on this have done a great job on building this mock up miniature set which is 1:5 scale of the full size thing (i think). So overall it's going to be BIG but i can't wait!


It's been great to work with them as its nice to get an outside perspective on the idea in general and improvements have been made that i would have never thought of if i'd been building this on my own.


The interior and exterior are hopefully going to be one large set, parts of which can be detached as and when they are needed. The technical drawings are currently being worked on but i'll put them up on here when they are ready

Thursday, 14 March 2013

Hands


My characters hands are based on the hands in Aardman's Pirates! (although nowhere near as good)

Once the armatures were made for them (washers with thin aluminium wire for the fingers and thicker for the wrist, epoxy glued then milliputted in place) I started sculpting the hands.


As per ALWAYS i spent ages on the first hand, then made the 2nd only to realise i preferred the latter, so had to resculpt the first. 


Ive had to sculpt them straight onto the armature (even though they are detachable if the fingers break) so i can get enough of a wrist on for the jumper to cover.

I wanted to spend a lot more time sculpting the hands but time is not something I have a lot of so had to move on to the laying up stage as seen below. In short, the process of encasing half of the sculpt in plastercine/clay in preparation of the first half of plaster to be poured on top. 

I've covered the ball joint in PTFE tape, then made it part of the arm as its easier to cut away the silicone after its been cast than it is risking the ball getting damaged in the cast. 


Saturday, 9 March 2013

IT WORKED


(not this one ^^^) My first attempt at making a Milliput mask to go on the face. The idea was to apply a layer of vaseline to the eye sockets/eyes, then put a thin layer of Milliput around the eyes. (All credit to Joshua and Nathan Flynn for this method  (See original post here)).  This would give me the basics to start sculpting Arthurs face on to without the eyes needing to be there, and meaning they can still move once the face is baked. In the one above, I sculpted too much around the eyes, and the Milliput sealed itself to the eyes and broke when I tried to pull the eyes out of the back of the head. 


This was attempt two, I decided to just go around the eyes, not actually sculpting anything complicated at this point. 


Once dried, the eye sockets were removed from behind, leaving a mask. 


The eyes can in future be pushed in from behind the mask.....


And held in place using the piece of K&S for the hat.


I am now ready to start sculpting onto the head with Sculpey clay.

Thursday, 7 March 2013

Facial Mechanics


In my previous post (Head Design) I'd worked out how my head was going to work, it was now time to start making it. One i'd drawn a scale plan of how it was going to look, started with the aluminium plate for the eye socket to sit on. I needed K&S to slot through the middle of it to attach the beard and hat.


To do this, i first drilled a hole the same size as the K&S (but round obviously) I then squared off the edges, making sure to check regularly that i wasnt making it too big for the K&S. 


Once it was the right dimensions, I slotted pre notched (i'll explain why later) K&S into place, glued it securely with epoxy glue, and massively secured it in place with miliput. 

I also needed the neck joint to attach onto this core piece. This was done with by cutting a piece of K&S at around a 30 - 45 degree angle, glueing in place again with epoxy glue (onto a perpendicular piece of aluminium) and encased in miliput. The ball joint was glued in place before all of this.


Skipped a few stages now, mainly down to poor photographing. Here I am holding the neck ball joint from the photo above. The K&S has had a smaller piece inserted into it (notched) with a ball joint glued inside of that. This leads through a double ball joint and onto the chin/jaw/beard piece. I have also attached supports up the sides of the original base plate in order to secure the eye sockets in place.


Eye sockets! In a very simple way. Made by pressing beads into sculpey clay (note - do this BEFORE you trim the edges of the clay to the shape you need. The sculpey will change shape once the eyes are pushed in, changing any shape you make before pressing them in).


I've had to file/sand down the eye socket. More work needs doing to it, foam added in the back and possibly eyelids but thats at a later date. Thin K&S has also been added into the other end of the larger piece running through the centre of the original base plate (its all getting confusing), for the hat to attach on to. (as seen below)


Current stage. Next I am going to semi fix the eye socket & eye balls in place, then apply a layer of vaseline over the top, followed by a layer of miliput. In theory, once the miliput has set, it will be removable from the face without taking the eyeballs/sockets with it. 

WISH ME LUCK!

Monday, 4 March 2013

Arthur head design

This has been bugging me for a couple of weeks now and i've been generally putting off designing the head for my character as its pretty intimidating. 

I want to make the eyes fully inside the head as this is something i always avoid/struggle with. Also avoiding replacement mouthes by having a 'simple' ball and socket joint in the beard and a moveable moustache (there'll be a basic wire armature in there) 

Believe it or not it makes sense in my head although it seems CRAZY complicated. 

Everything i've made until now has pretty much been just a block of foam with some stuff stuck on it so hopefully this one'll work! 


i'm definitely doing a more simple character next year.

Sunday, 3 March 2013

Prop painting


Like i said in the previous post, I want to spend a LOT more time on props than i did in my Minor Project. With my last set, all of the props looked new and well kept, I want the opposite for my major film so the paint job is very important


This is my record player at current, i've added small triangular metal pieces on the corners (see bottom picture). I rushed the needle arm and record itself so need to remake those but this gives a general idea on what it'll look like. 


Then on to the TV! Again I wanted to make it look older so (as with the other props) I used wood dye on balsa wood and then used acrylic paints to add highlights and shadows to it. The buttons are all made from miliput. 


In my film, the initial 20-30 second advert will be done in flash by Jake Harvey. So I've made the inside of the TV green so it can be removed at a later date to insert the advert.


The buttons were painted using acrylic paint (i'm still not happy with the way they look as the camera will be still on them for such a long amount of time, but they'll do for now). The antennas are aluminium wire, painted to look like copper (incase it still needs to be animated with the book flies at the TV) with more miliput to keep it in place and on the ends.

Props props props

As i've already made a basic plasticine model of my character (See here) I figured i'd start building props. 

With the minor project, the focus was very much on the character, and all in all i only spent around a week making the props and set. 

As the props are much more of a focus in my film this year, I wanted to set aside time to them sooner rather than later before I get caught up building Arthur. 


There are 3 main props that Arthur interacts with in the first scene of my film, A TV, a record player and the navigational system. 


I wanted to start with the machine, as this will take a lot of time to work out electronics and circuits and such to make parts light up. There are also a few buttons/levers on the machine that Arthur has to use. Once bulked out, I decided to bulk out a few of the other props. 


I recently saw a stop motion piece called "My Strange Grandfather" (link here). Definitely worth a watch! It had a REALLY nice record player in it. Since seeing that, i've wanted to make something similar. Already my props are looking better than they did for my previous project. 

The table is just rods of balsa wood, carved with sandpaper to make them look nicer. 


I've also bulked out a TV! Didn't take a close up photo of it at this stage for some reason, but i've got LOADS of it painted. 


Saturday, 2 March 2013

I hear 'Malvern Armatures' are really great!

Haven't posted in a while, would like to say i've been really busy but thats only really true as of the last few days.

I've been working on a few things simultaneously but i'll start with the Armature. 

The armature i'm using for Arthur in this film is a bespoke build from Malvern Armatures, they offer a service to send you your armature ready built but I wanted to have a go at building it myself just to properly learn the process. With none other than the owner of Malvern Armatures sat RIGHT NEXT TO ME! (mainly because its my dad, this does not come with the regular service)


After laying out all of the pieces to make sure I had everything I needed, I started assembling the armature. 


Using 'Loctite' to secure the ball joints means they won't come apart if done correctly during animation.


After each joint was locked, (the loctite needs around 12-24 hours to fully dry) it was time to start assembling the final armature, making sure to clean each of the balls individually with lighter fluid to get rid of any excess Loctite. 


Due to my design not being accurate enough on the side view, The neck joint was too low on the body, meaning the movement was restricted (the assembly on the right). Those lovely people (person) at Malvern Armatures sent me down a re-designed chest assembly with a new neck and wider shoulders to attach onto the rest of the Armature within a couple of days


Any there we have it! Arthur Quasar in his simplest form.


For more information on Malvern Armatures, Click on the tab at the top of my blog! or simply go to